French Press Technical Illustration

This was a very long project, starting with some basic sketches of the object to be done and ultimately producing a realistic technical illustration in Illustrator of the object “exploded,” that is, with all of its parts visible.

I began with these pencil sketches of my chosen object, a Mr. Coffee French press, which produces my husband’s lifeblood every morning. Then the work in Illustrator began. This was the first draft of the object, just a simple line drawing on an isometric grid, with a color background so that the transparencies could be seen.

Next to that is the second in-progress version, also shown with a draft mockup of the product’s presentation. It’s clear that some things were developing well, like a couple of the gradient meshes used on the lid and the flat plates, while some things were still eluding me, such as the right gradient to use on the cylindrical frame and smoother shaping of the handle.

(If you click that image to embiggen it, you can also see the false starts with fonts and layout of the annotations, and the messy spirals on the spiral plate that I gave up on that night. They were hard, dangit!)

But after lots and lots of work on those things, and much refining of the gradient meshes (during which I learned A TON about using them: namely that I’d been doing it wrong from the beginning and really needed to start over!), this was the final result.

final-version

This is just the exploded object by itself, clean with no background or mockup, although the purplish reflected light is kind of obvious. (I used that purple because of the background colors in the mockup, which are based on Mr. Coffee packaging.) That handle’s looking a lot better, as are the linear and radial gradients on the cylindrical shapes and the meshes in general. The spirals on the spiral plate look more spirally AND connected to the plate. Plus! There are glinting edges on the frame and carafe, so they don’t look two-dimensional. But you can probably see them better in…

The final mockup!
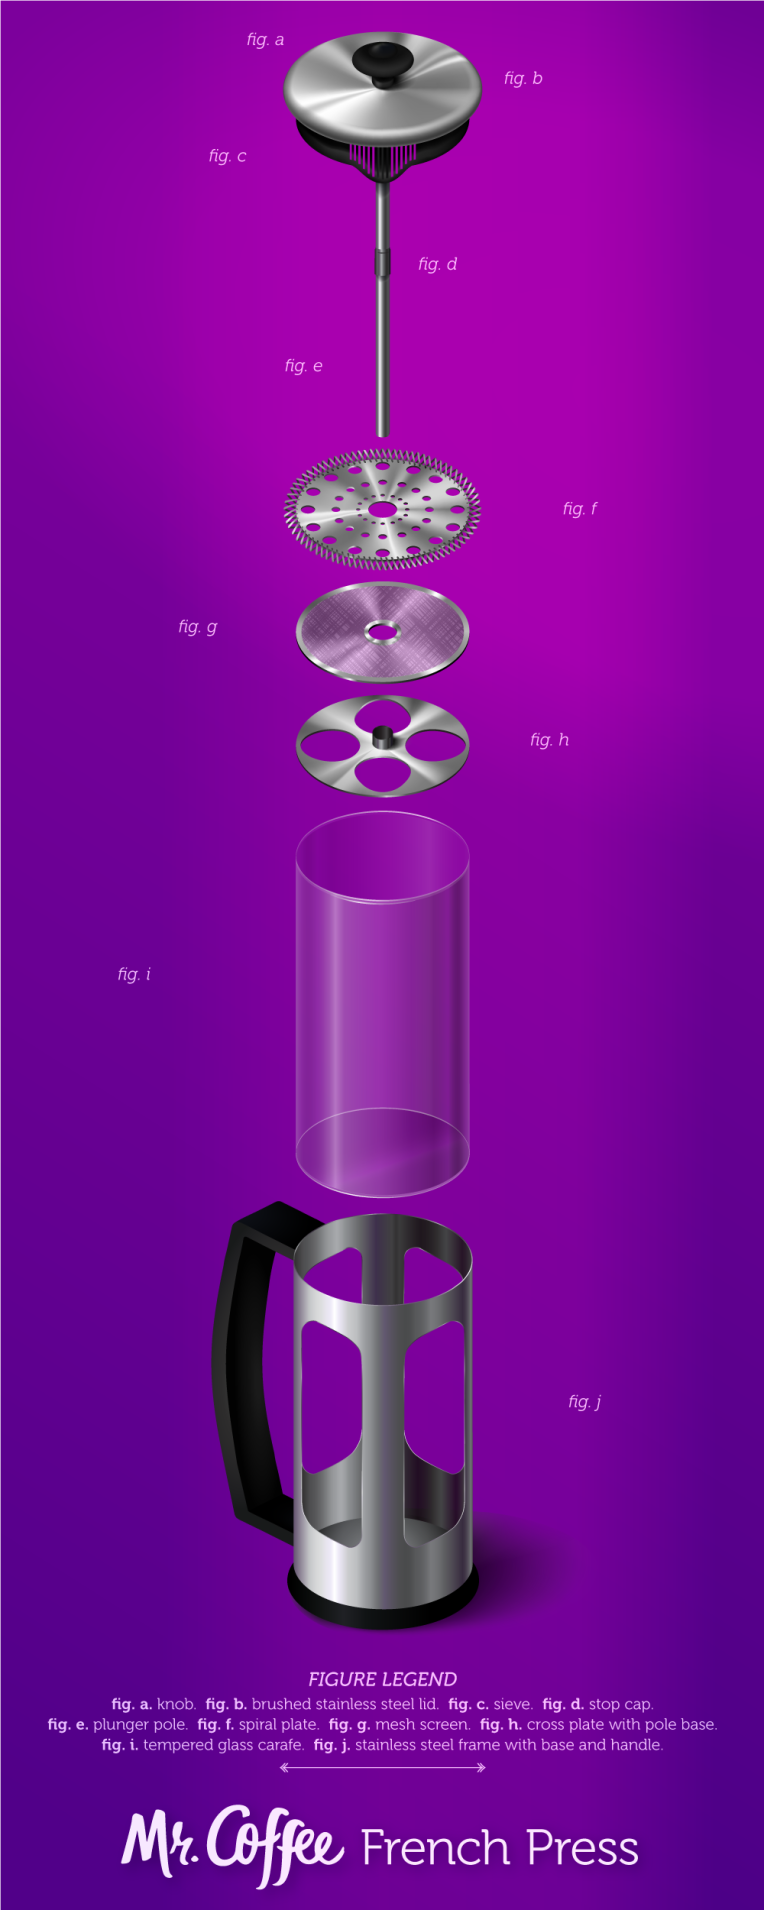
frenchpress

Shadows and reflected lighting and light flares, oh my! Plus a font overhaul (thank you, peers who suggested doing so), and a return to my original idea for the layout.

Were this to be printed, it would need a specialty size, but there is a standard-ish specialty size for it, as I found. But this is a tall object fully exploded, and I decided to work with that instead of against it.

Legos + Orthographic Views

This little assignment involves orthographic drawing, which I hadn’t done before but find kind of fun. The idea was to build a simple shape out of Legos and produce six orthographic sketches of that shape, one for each side. Here’s the shape I built. The front view is a little off since my camera was slightly above the shape, but it gives the right idea.

And here are the original hand-drawn sketches, presented based on the Glass Box theory. It was more difficult than I’d anticipated to draw without paying attention to perspective, especially since my shape involves a piece with a slope in the front and things stacked on other things.

six-sides

I’m still not sure if some of the views are quite right, because I keep getting tripped up on the perspective. But as the next step, we were to refine the sketches in Illustrator. I made sure to add the dashed lines to indicate invisible shapes.

neaswalls_orthoviews

::UPDATE::

The third part of this assignment was to translate the orthographic designs to isometric. Illustrator’s neat 3D Isometric settings did most of the work for me on the main body shape. But the 3D conversion didn’t handle the round bit stuck on the top of the thing or the little connective Lego nubs, so I just had to draw those out myself on the isometric grid, using a tutorial I found on Tuts+ that explained how to do circles and cylinders. Here’s the result!

neaswalls_isometric

Zebra custom die-cut hangtag

I’ve already posted a couple of times about the Grevy’s zebra character design process. But now I want to share the process of designing the hangtag that the zebra character was developed for. The idea was to create something that would hang from a plush animal, and would show the illustration of the animal, its name, some good facts about it and its endangered status, and present the WWF logo and proceeds line and a barcode.

I printed the thing and actually hung it on a zebra plushy I have and took a few snaps of that, and it’s adorable, so those will be included too. But first things first: the original concept sketches for the tag.

hangtag_roughs

Not the most exciting tag shapes, I know. At this point, I was primarily concerned with getting some idea of how to incorporate the Ethiopian tibeb patterns, which can be very simple or very complex and use lots of colors. Traditionally, they are patterns made in a strip at the hem of a garment, and can be of varying widths. The most common patterns I saw used in my research were based on diamonds, and that’s what I used.

A couple of examples from good old Google of authentic tibeban:

Figuring out a better die-cut shape came later. It was made by uniting several elongated diamond shapes (it’s everywhere!) stacked over each other.

custom die guide

The magenta guide shows the shape, with the general location of the zebra character. I like its funky angles, and I think people would be more inclined to physically touch it because of its odd and irregular shape. Cute zebra on the front is a bonus.

Onward. Doing the tibeb patterns was really the trickiest bit. The goal was to use several rich and vivid colors in the patterns (in keeping with tibeban Google found for me to draw from), but not too many different colors, and lay “hems” of various patterns next to each other, but have each pattern be distinguishable next to the others, and use bold zebra black and white for text/text-boxes so they would stand out, AND not do anyone’s head in with a crazy jumble. Et voila.

It works! I think. Shown here with die guide and bleeds, which were cut off by my handy X-ACTO blade after printing to some cardstock.

My home printer is a basic inkjet, so there was some color quality loss, but not too bad. Gluing two funky shapes back-to-back while trying to get the edges and corners lined up just right was way harder than I imagined. Which reminded me a) why I don’t do a lot of fiddly crafts (I have big fingertips and no patience) and b) that I need to make myself learn paper cutting (I need more dexterity and patience). Sisyphean task? Only time will tell.

Finally, for the best part of this whole project: the plushy with the hangtag on it. Just to be clear, I did not go to a store and buy this plushy just for this occasion. I already had it. Yep.

Zebra character final

The finished version of the zebra character is here! Changes made between the WIP2 version and this one are kind of minimal, but I think they make her look better overall: the right arm was pulled away from her body to be less likely to “disappear” from the arm and body stripes blending. Accordingly, the stripes and shadows were adjusted.

Also, green background this time, just to be different. Actually, the three background colors I’ve shown so far are, funnily enough, the three main colors I’m using in the patterns on the hangtag, which I will post here when it’s done.

And now for the zebra!

character final

Zebra character sketch

This is also an assignment, in a different class, but I’m posting it just because I want to. (Hey, maybe I’m starting to like doing this sketchblog thing! But I better not consider that too much, or it’ll run away.)

This is part of an ongoing project that will ultimately result in making a custom die-cut hangtag for a plushy, sponsored by the World Wildlife Fund. (NB: I’m unclear if the WWF is actually part of this assignment in any real way. I don’t imagine so. But it’d be pretty cool if they are.) I chose Grevy’s zebra as my animal to base a character on, mostly because zebras have been my favorite animal forever.

In a previous life (read: high school), I drew TONS of characters with my friends. We were into really nerdy things and loved to draw, so it happened. But for some reason, I was anxious about doing this. I felt like I suddenly knew nothing about creating an anthropomorphic character (which is patently untrue) and have second-guessed myself every step of the way. Maybe that’s because this one is for a grade. Or maybe my brain just hates me that much. Who knows.

Anyway, here is the process so far: the original sketch, the first WIP, and the second WIP. The differences between the two WIPs are mostly shading and making the smile and eyes bigger for a cuter effect.

She’s cute. I now have this idea to build a story around her and do some spreads that would be fit for a children’s book. I’m sure I can get that done in my copious spare time.

Insert for Apartment Info Folder

The past couple of weeks, we worked on a project designing a half-page, double-sided insert that would go in a standard pocket folder and be accompanied by information sheets on the apartment complex. The insert is supposed to showcase the available floorplans and show a property map on the back.

I started by doing rough versions of the property map and the floorplans in Illustrator, which you can see here. The floorplans PDF also includes some typeface ideas. I’ve put up the PDFs of these instead of inline images since they are, in fact, rough.

neaswalls_map01

neaswalls_3floorplanstype

Next stage was getting a preliminary design of the front and back of the insert, which you can see below. This part was done in InDesign. I always feel like my in-progress pieces are very much in-progress-looking. I tried out some “designy” things in this stage that didn’t work really (the dotted lines and circles) and was trying to pull the colors from the company logo, because I had a really hard time coming up with something else good at first.

And finally, the final stage for this project. Lots of things are readily different. I still had a hard time finding a satisfying layout for the back page with the map, but settled on what’s here because it fits the front side and isn’t the worst ever.

The colors this time are much closer to what I had in mind from the beginning: bright, springy greens and blues inspired by lush gardens. And this way, the pink of the hummingbird in the logo stands out more. I am still not 100% on the map, but after trying out some texturing in Illustrator and being thoroughly convinced that just didn’t look very good, I left it clean.